Mushroom Risotto (Instant Pot)

Heyyyyy! I’m posting AGAIN!! Two in a row! 😂
Guess I need to get a life, eh? Never mind… like I said before — don’t get used to it!

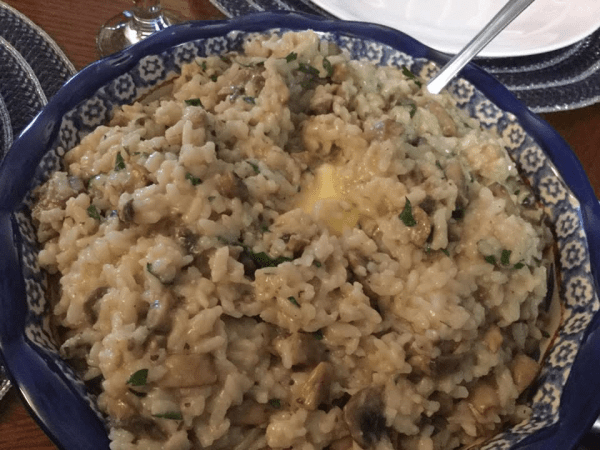
If you’ve got an Instant Pot, you HAVE to make this Mushroom Risotto. 🍄
Well… I guess you’d also HAVE to like mushrooms too 🙄 — but if you do, this recipe is pure comfort in a bowl.

It’s creamy, savory, rich, and downright luxurious without all the stirring you’d usually do for risotto.
And if you’re lucky enough to have leftovers? Fry up an egg and plop it on top the next morning. Boom. Breakfast of champions. 🍳

If you don’t have an Instant Pot… I got nothing for you here. Move along to another Bite Me Canada recipe please 😶.

Make this. Bite this. You’ll thank me later.

#delicioushappenshere #funologyoffood #bitemecanada


Ingredients 🍄

The “stuff”…

  • 2 Tbsp extra-virgin olive oil
  • 1 lb mushrooms, trimmed & sliced
  • Salt & pepper, to taste
  • 1 medium onion or shallot, chopped (I prefer shallot — it’s classier)
  • 2 cups arborio rice
  • ½ cup white wine or vermouth
  • 4½ cups chicken stock
  • ¼–½ cup grated Parmesan cheese
  • ¼ cup chopped fresh parsley
  • 2 Tbsp butter (just before serving — because we’re fancy like that)

Instructions 👩‍🍳

What to do with the “stuff”…

  1. Set your Instant Pot to Sauté and pour in the olive oil.
  2. Add mushrooms and cook, stirring, until any moisture evaporates and they start to brown. Season with salt and pepper.
  3. Add onion or shallot and sauté until translucent, about 8 minutes.
  4. Stir in the arborio rice and cook for about 3 minutes.
  5. Pour in the wine or vermouth and cook until mostly evaporated, about 3 minutes.
  6. Add the chicken stock, give it a good stir, then lock the lid in place.
  7. Make sure the steam valve is set to Sealed. Select Manual and set it for 5 minutes on High Pressure. (It’ll take about 10 minutes to build pressure before it starts cooking.)
  8. When done, turn off the cooker, Quick Release the steam, and remove the lid.
  9. Stir it with a wooden spoon — it’ll look a little “liquidy” at first, but trust the process.
  10. Add parsley, Parmesan, and more salt & pepper to taste.
  11. Just before serving, stir in butter — because, you know… we’re fancy like that.

Serve hot, sigh dramatically after your first bite, and tell everyone you slaved over it. 😉


Notes 📝

  • Use a mix of cremini and white mushrooms for extra flavor.
  • Leftovers reheat beautifully — or enjoy them with a fried egg on top for breakfast.
  • If you want it cheesier, just keep grating that Parmesan like it’s your cardio.

Recipe Credit: Adapted from epicurious.com

Baked Kung Pao Chicken

Hey Bite Me Foodies! 👋

I’ve been a little quiet the last few days… been busy with a baby shower food thang! So tonight, Ken is finally getting a real home-cooked meal 😉

But don’t worry — he hasn’t been “starving.” The last time I cooked (Thursday), I made this absolutely delish Baked Kung Pao Chicken, and it was darn good!

⚠️ NOTES:

  • You’re gonna want to double the sauce — trust me.
  • Stir every 15 minutes while baking to get that sauce nice and thick and the chicken perfectly glazed.

I served it over Jasmine rice, and it was truly bite-worthy.
Make it. Bite it. Love it. ❤️

#bitemecanada #funologyoffood #delicioushappenshere


Ingredients 🍗

The “stuff”…

  • 3 boneless, skinless chicken breasts, cut into bite-sized pieces (or thighs if you prefer)
  • Salt & pepper, to taste
  • 1 cup cornstarch
  • 3 eggs, beaten
  • ¼ cup canola oil
  • ¼ cup soy sauce
  • ¼ cup vinegar
  • 1 Tbsp red chili paste (like Sriracha)
  • 1 tsp minced garlic
  • ¼ cup brown sugar
  • ½ Tbsp cornstarch
  • 1 red pepper, chopped
  • ¼ cup peanuts
  • Chopped green onions, for garnish

Instructions 👩‍🍳

What to do with all the “stuff”…

  1. Preheat oven to 325°F.
  2. Cut chicken into bite-sized pieces and season with salt & pepper.
  3. Place cornstarch and beaten eggs in separate bowls. Dip each piece of chicken into cornstarch, then coat with egg.
  4. Heat oil in a large skillet over medium-high heat and cook chicken until browned.
  5. Transfer browned chicken to a greased 9×13 baking dish.
  6. In a bowl, whisk together soy sauce, vinegar, chili paste, garlic, brown sugar, and cornstarch. Pour over the chicken and toss to coat.
  7. Add chopped red peppers and peanuts on top.
  8. Bake uncovered for 1 hour, stirring every 15 minutes to glaze the chicken evenly.
  9. Serve hot over Jasmine rice and sprinkle with green onions.

Sooooo… BITE ‘EM! 😋


Recipe credit: ohsweetbasil.com

West Coast Poutine

Good day y’all!!! 🌧️
Hope you’ve had a lovely weekend. We had some much-needed rain… have I told you I LOVE rain?!

And rainy days need comfort food, right?
So in the Bitemecanada Kitchen we made West Coast Poutine — and it was AMAZEBALLS!

We bit it two days in a row — it was THAT BITEABLE.
So here’s what I did…

#bitemecanada #funologyoffood #delicioushappenshere


Ingredients 🍁

The “stuff”…

  • 3 cups (or whatever) assorted veggies, cut into ½–¾” dice
    (They shrink when roasted — you don’t want “specks” of veggies!)
    • I used onions, fennel (love fennel!), carrots, radishes (taste like taters when roasted — low carb idea!), broccoli, cauliflower, peppers & kale.
    • But you do you — any veggies work.
  • ¼–⅓ cup GOOD olive oil
  • Seasonings of your choice (I did Italian herbs & pepper)
  • ½–¾ cup cheese curds (mine were from Costco — “squeakers”!)
  • Brown gravy (I use the Costco Trio mix — no fat, no MSG, no GMO, and super tasty!)
    • Mix ½ cup gravy mix into 2 cups boiling water
    • Add 2 Tbsp horseradish (optional but amazing)
    • You can also add sautéed mushrooms or onions — or nothing but LOVE ❤️
  • 1 lb cooked, crumbled, and drained ground beef

Instructions 👩‍🍳

What to do with the “stuff”…

  1. Preheat oven to 400°F.
  2. Wash and cut all veggies into chunks (remember they’ll shrink — make them big!)
  3. Toss veggies in a large bowl with olive oil and seasonings until evenly coated.
  4. Spread onto 1–2 sheet pans in a single layer (so they roast, not steam).
  5. Roast for 20 minutes, stir, then roast another 15 minutes or until caramelized and slightly charred.
  6. Turn off the oven. Sprinkle cheese curds over veggies and return to oven until melty and gooey (nobody likes a hard squeaker!)
  7. While veggies roast, make your gravy and doctor it up however you like.
  8. To assemble:
    • Spoon a dollop of gravy in the bottom of a bowl and swirl it around.
    • Add ½–¾ cup cooked ground beef on top.
    • Add the roasted cheesy veggies over the beef.
    • Spoon that glorious beefy, horseradishy gravy all over.
    • Garnish with green onions and serve with warm naan bread.

Result: Off. The. Hook. 🔥


Notes 📝

I used ground beef because Ken is a total ground beefaholic, but you can use any protein — just cook it first.
Or skip the meat entirely. There are no rules here.

The ideas are endless… make it, bite it, and let me know how many ways you ❤️ it.

Recipe credit: Bitemecanada Kitchen

Blog at WordPress.com.

Up ↑